
Mission Possible 2018
Written 9-1-19
Coming in to senior year, one of the events that I was excited to have come in from rotation was Mission Possible. The gist of the event is to build a Rube Goldberg machine that comprises of various defined tasks. What I especially liked about this year’s rules was that microcontrollers were allowed. After getting the rules, I immediately got to brainstorming the most efficient and compact way to do every task and maximize points. I also noted the vagueness of various different rules that would prove a huge pain later in the year when clarifications would come out that changed the standard interpretation.
Here’s a brief summary of the tasks that we had to do. Some of them actually changed after some clarifications and rule changes.
- Remove magnet to start
- Chemical reaction inflates balloon 20cm
- Endothermic action
- Exothermic action
- Add pure water to closed container to complete circuit
- IR emitter transmitter and receiver 20cm apart
- Light initiates chemical reaction
- Pulley of IMA >7 to lift >0.5kg object 10cm
- Pulley of IMA 0.5 to lift >0.5kg object 10cm
- Use all 3 classes of levers
- Flip a quarter airborne so it goes from heads to tails
- Thermal action expands gas
- Activate homemade electromagnet
- Play recording of phrase “The End” to signal end
- Chemical timer
v1
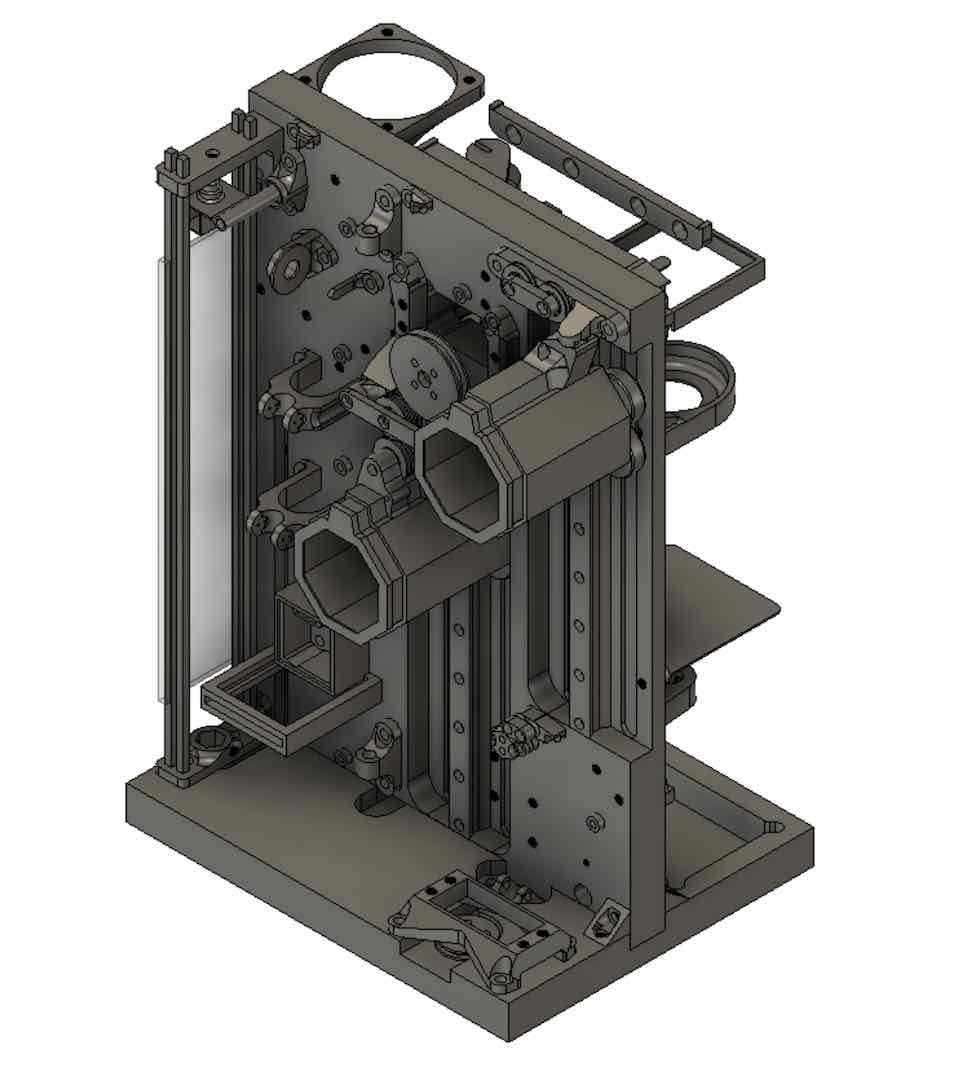
I started v1 right when the rules came out in September. Since I never built a Mission Possible device before, I didn’t focus too much on making it small. I just needed a platform to experiment with the various ideas I came up with. Also, the complexity of the event meant that pretty much no one would show up to tryouts except me. Still, I put off college apps to put together a device that would be able to perform admirably even at Nationals.
CAD
Easily the most revolutionary thing I taught myself the past summer was building assemblies in Fusion 360 or at least designing multiple parts that fit together in one file. Yes, I did learn this a little late because I didn’t have a teacher for CAD up until senior year. Well, after a huge brainstorming session, I got to designing v1.
I could go off about how I designed each task, but considering how long that would take because of the numerous tasks, I’ll just elaborate in the v2 section.
After printing out the parts and using my CNC router to make the backboard and base, I moved onto the electronics.
Electronics
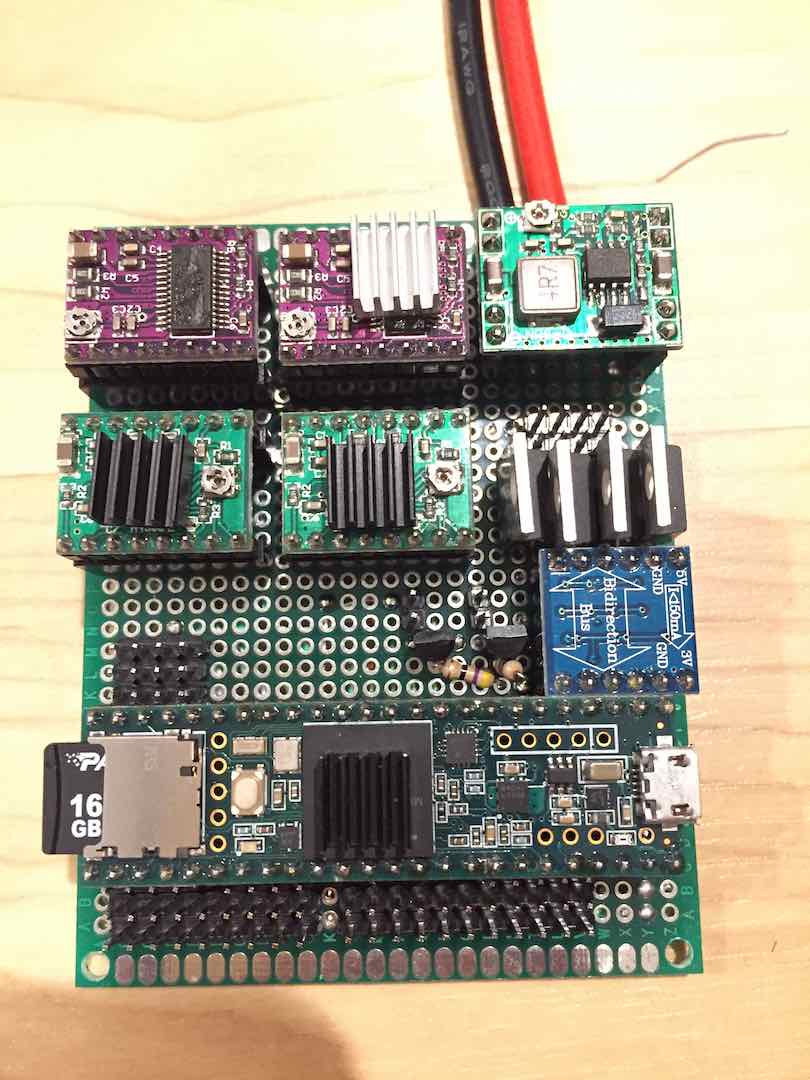
Based off of the initial release of the rules, I used one microcontroller (Teensy 3.6) to control everything. To comply with the rules, in the code I made sure each task clearly triggered the next one if successful. I spent a good 3 hours soldering together what I called the motherboard.
During tryouts, one of my coaches Mr. Kim noted that using one microcontroller was pushing the wording of the rules a bit. He was right because later on there was a clarification that said microcontrollers could only be used for one task each. Thankfully I made the switch before then so it didn’t catch me off guard.
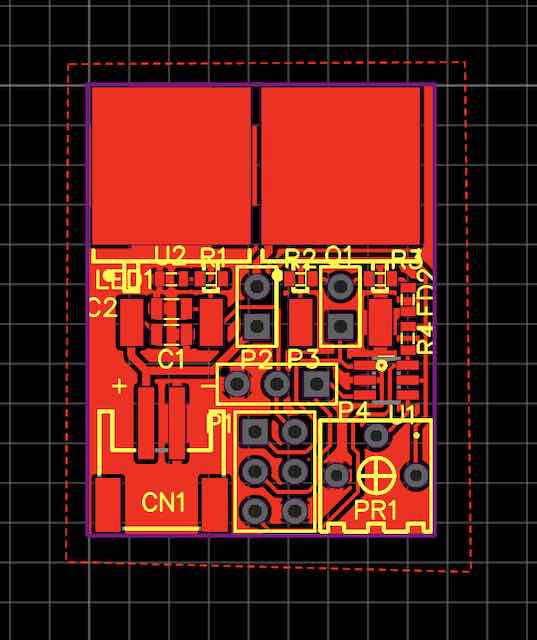
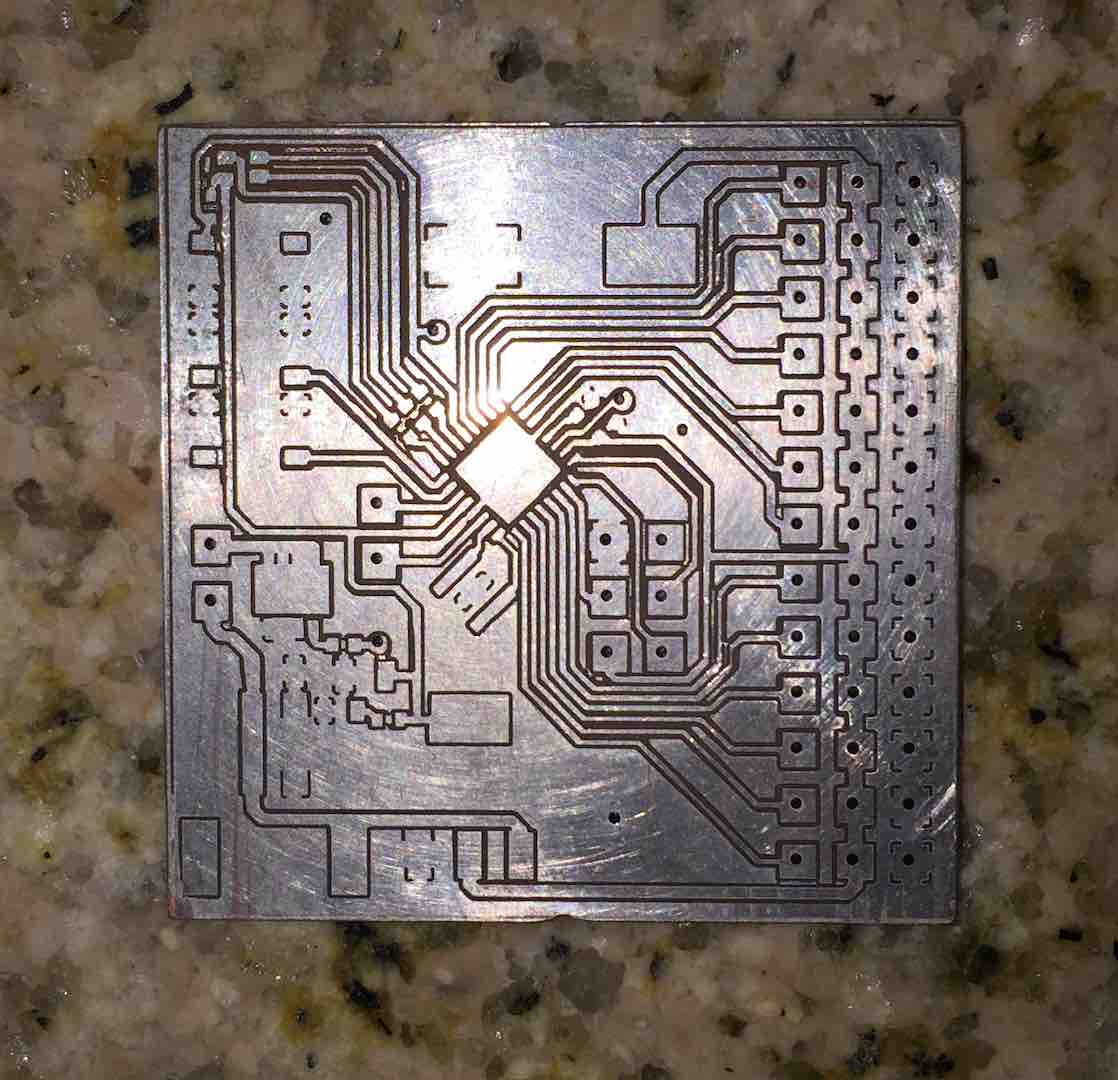
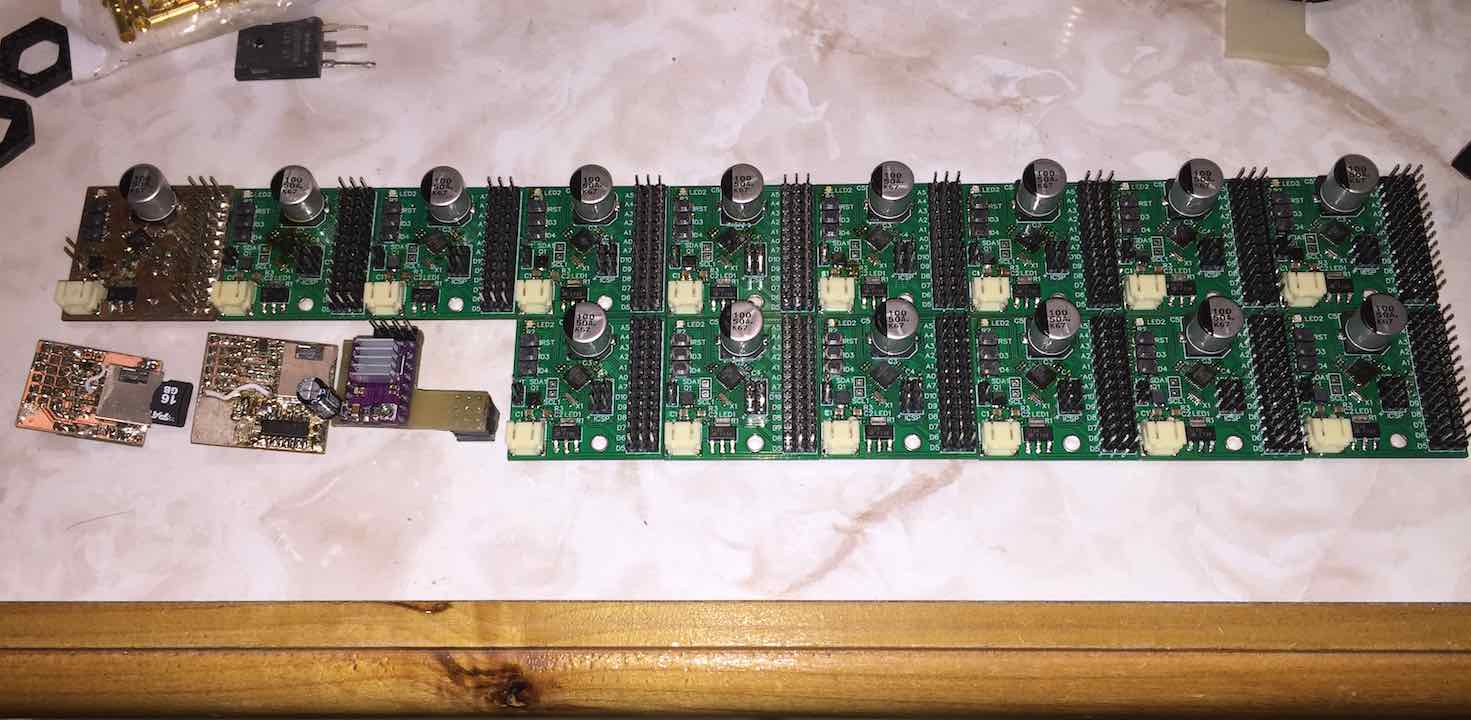
Using EasyEDA, I designed a general purpose Arduino based board for use in v1. This was also my opportunity to dive deep into using SMD components because I needed these boards to be small. I also made a mini ATtiny10 board for the simpler tasks and to start learning how to use Atmel Studio 7.
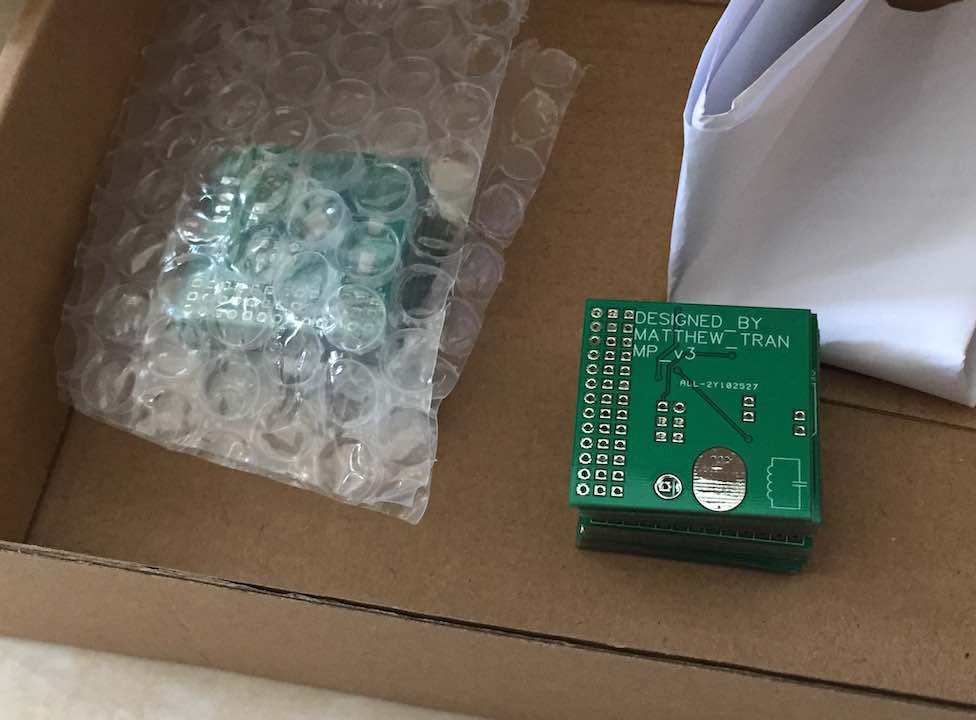
Initially for cost and time reasons I wanted to mill the boards at home. After finding out about ALLPCB, I settled for trying to make the boards at home while waiting for the ones from ALLPCB to come in. It was then that I realized that milling boards at home is only viable for a prototype or one-off, but definitely not when you need a bunch.
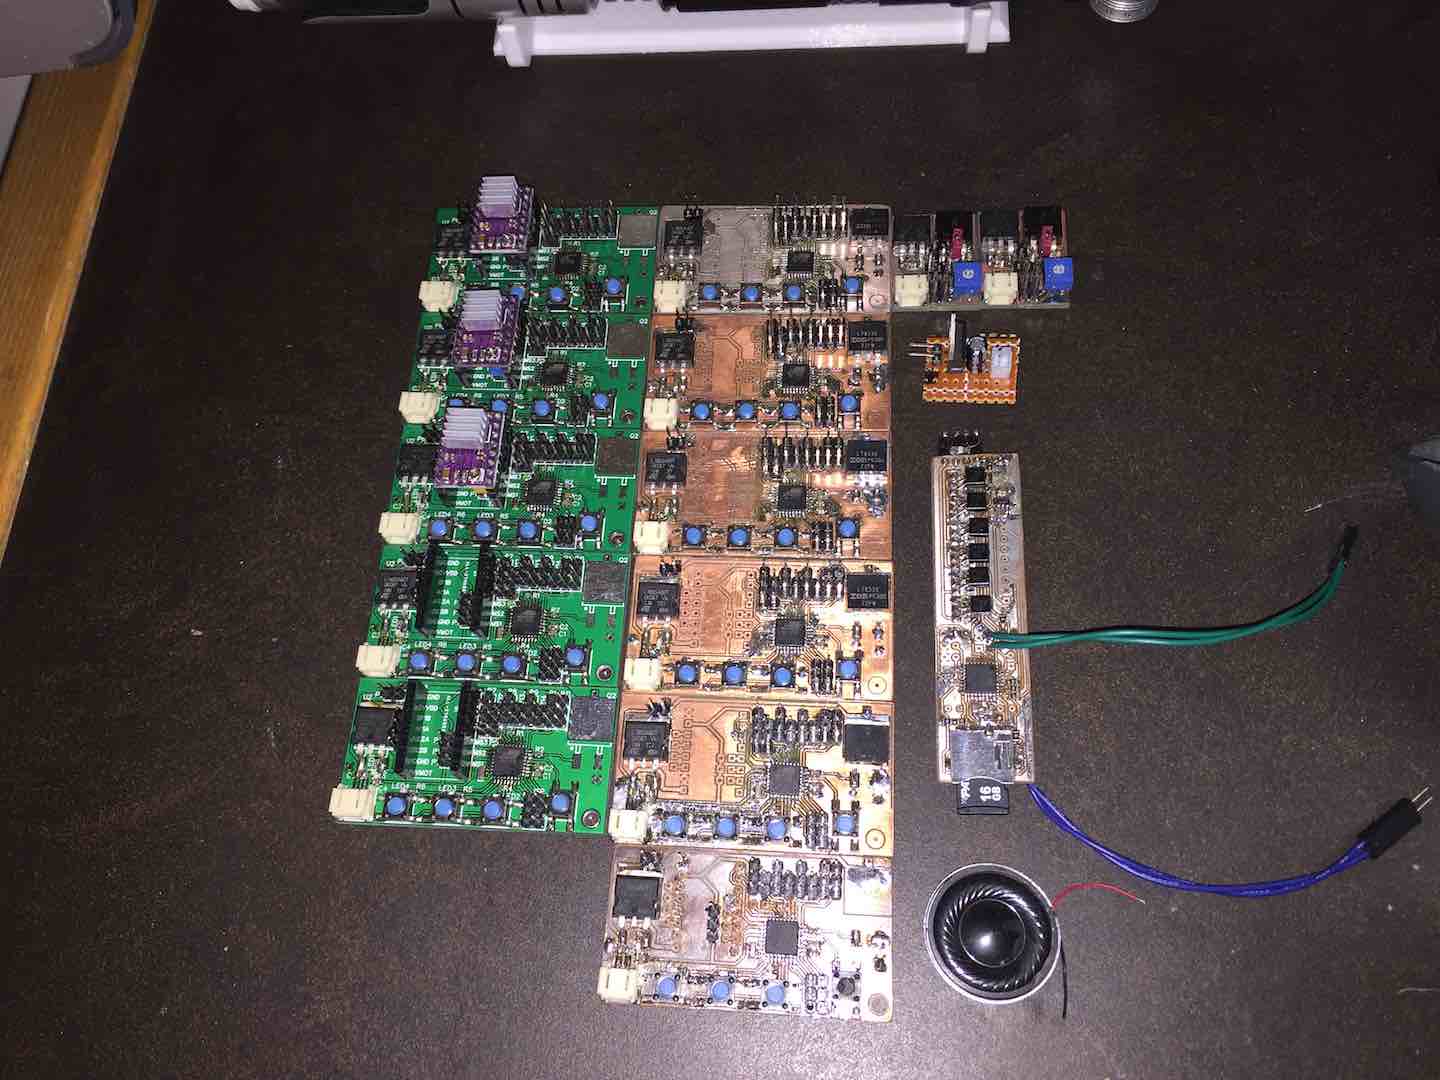
Rewiring the entire v1 for use with individual boards was a bit of a pain but I was successful.
Performance
v1 performed all of its tasks perfectly. In terms of points achievable that didn’t involve size, it got pretty much all of them. However, after multiple rule changes and clarifications that meant going back to the drawing board on some tasks and also wanting to make it smaller for easier transport, I did feel the need to build another one.
v2
Partially because of senioritis but mostly because of cost, I initially didn’t want to build v2. Troy SciOly engineering events are pretty much student-funded since the school only pays for our travel expenses. We do have a workshop, but it isn’t particularly well stocked. Since he wanted us to perform better at Nationals, our head coach Mr. Wahl offered to sponsor my building of v2 using the funds we did have. Since I knew we didn’t have too much funding, I only asked to be reimbursed for any new parts I’d buy and would donate v2 to Troy at the end of the school year.
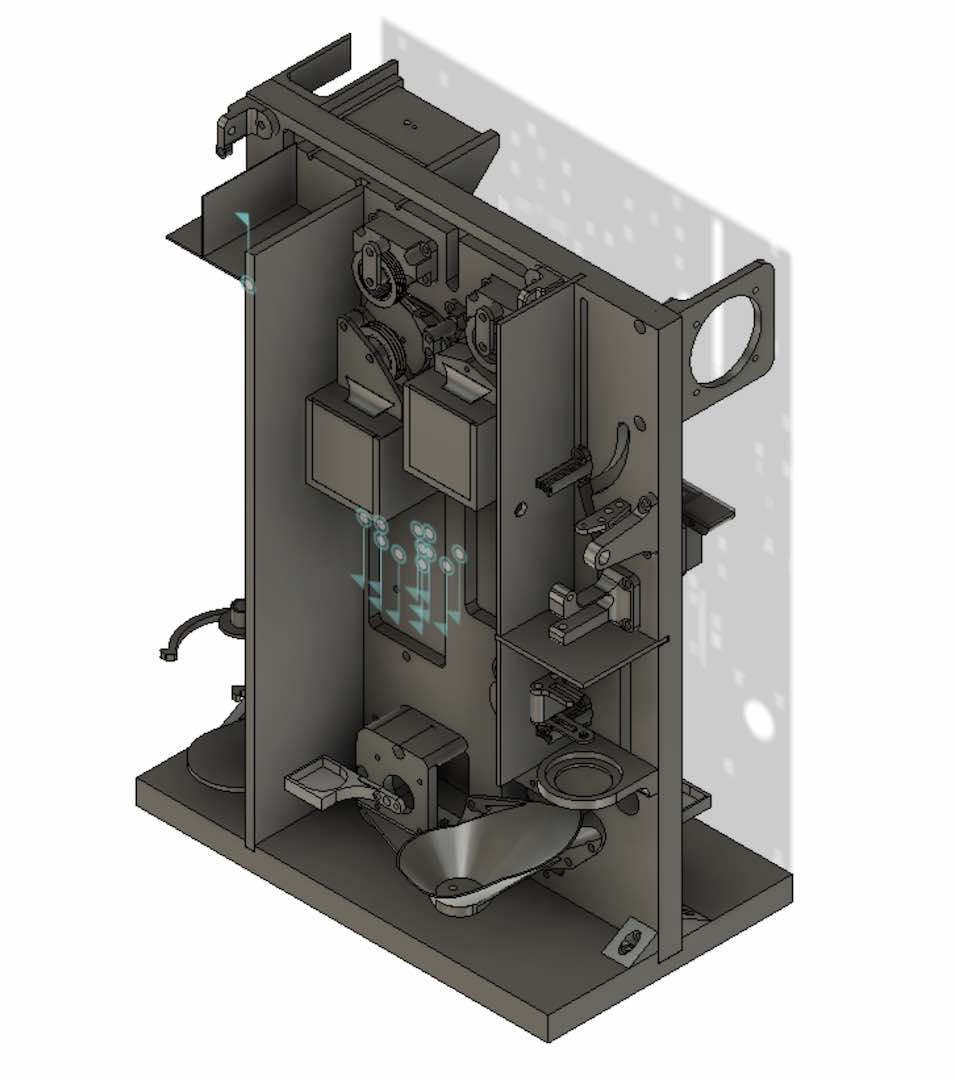
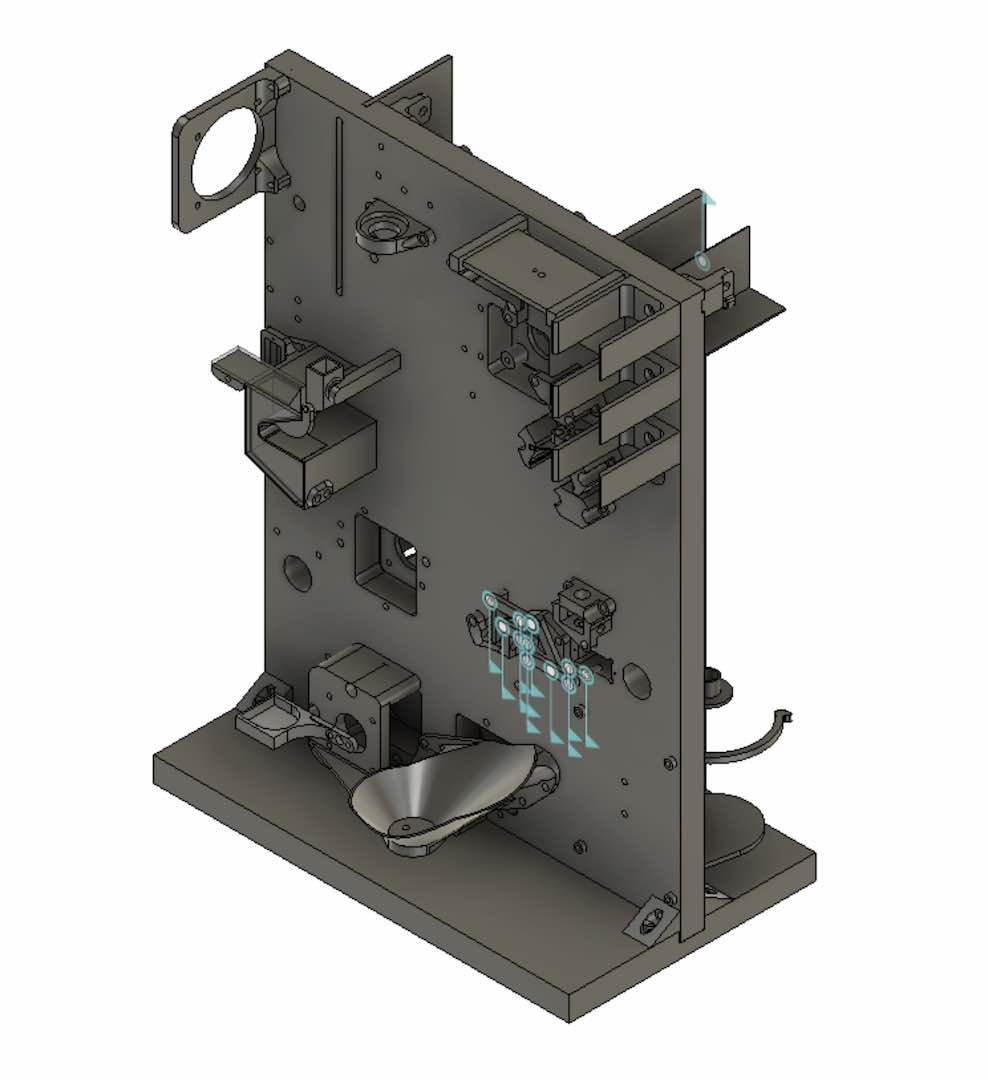
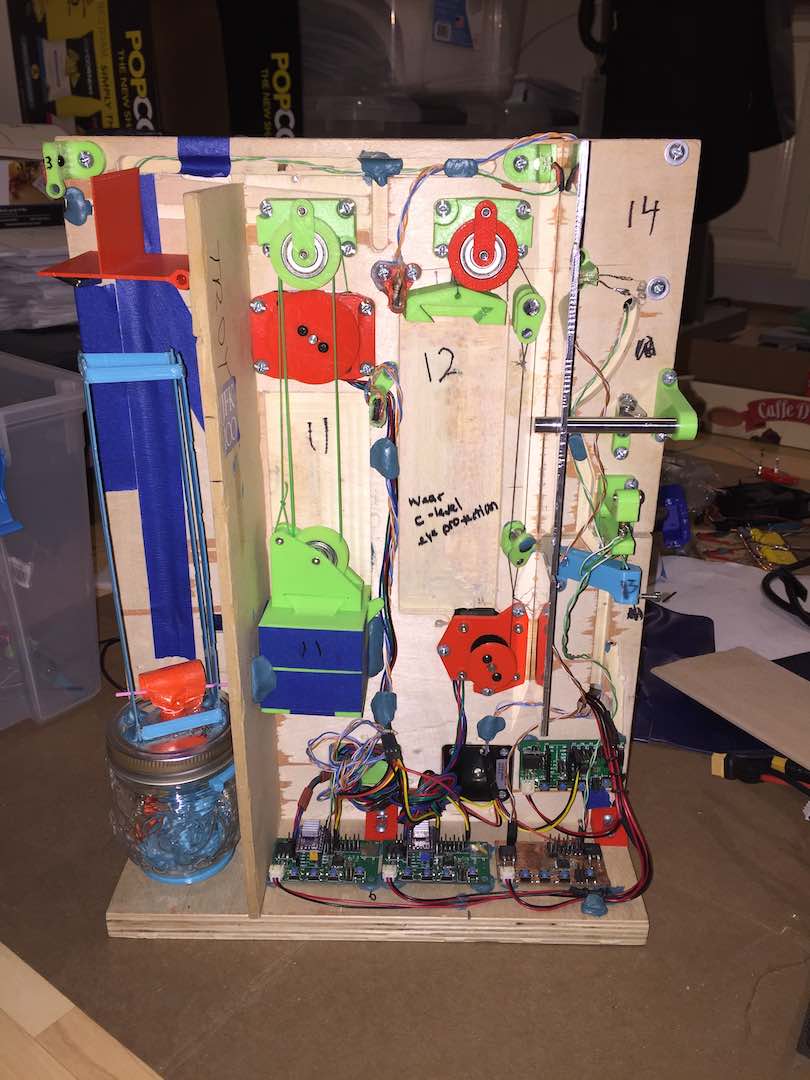
Over the course of our week-long spring break right before the State competition (SoCal), I completed v2. The main focus was to make it as small as possible while also accomplishing every task and following the various rule changes and clarifications that came out. Making it reliable and easy to use was a given. Also, it had to be pink.
Designing Each Task
Planning out each task so that they triggered each other in the most efficient way was easily one of the biggest challenges with this project. Here I’ll describe how I did each task in the order I did them in.
Start – Removing a Magnet
The start task was to remove a magnet, which would release something and trigger the next action. This one’s pretty trivial.
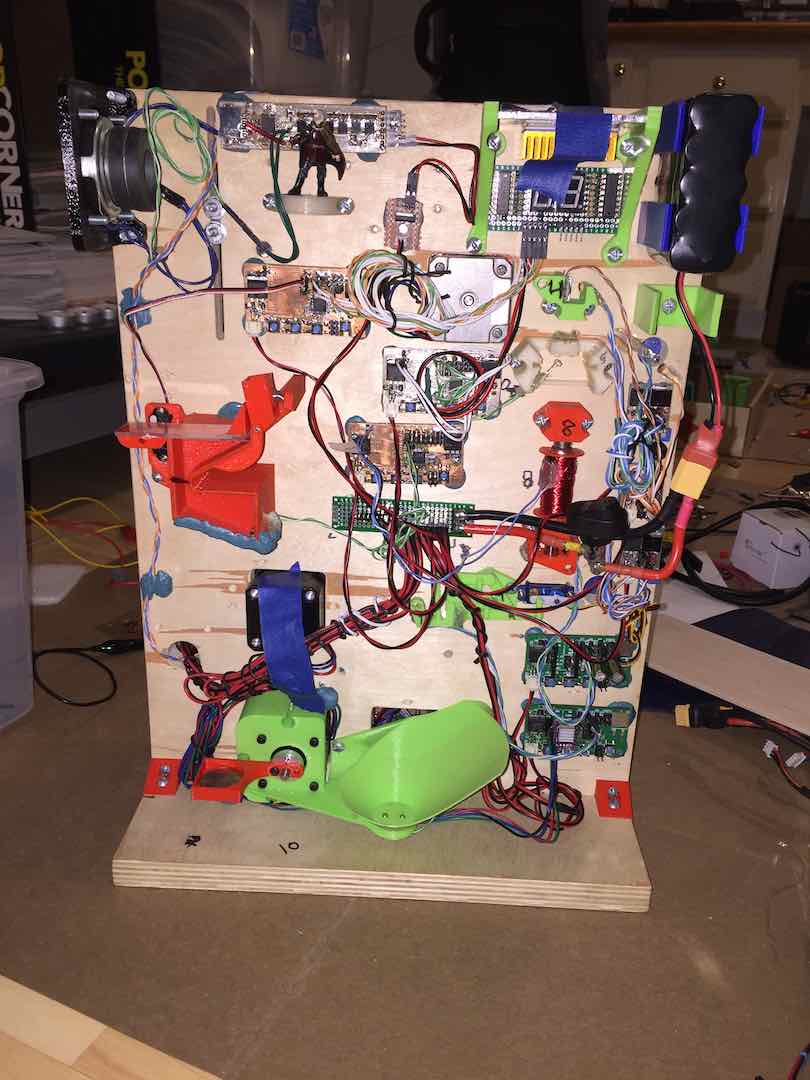
Chemical Reaction Inflating Balloon
Getting this task to be short was an interesting challenge. I didn’t have the tools to build a custom airtight container, so I used an off the shelf mason jar. Instead of attaching the balloon to the top of it, which would be too tall, I used a silicone tube to redirect the air to the balloon on the other side.
For ease of acquiring materials, I used vinegar and baking soda. Pulling the magnet would let a cup of vinegar fall onto the baking soda, producing gas. To determine cup size, I did a rough calculation of how much vinegar was needed to make enough gas to fill the balloon. Designing the cup to always fall over took a bit of trial and error because the baking soda molds to the bottom of the container.
Getting a small balloon to hit an object 20cm away was also a challenge. I ended up making my own long balloon using a Nike shopping bag and a clothing iron. Inspired by party blowers, I rolled the balloon up and used guide rails to get the balloon to hit a flap 20cm away.
IR Transmitter and Receiver
This one is pretty trivial. The flap closed a switch which turned on the IR transmitter.
Endothermic Action
Since it didn’t have to be a chemical reaction, I used a Peltier coupled with a thermistor.
Exothermic Action
For some reason, an LED counts as completing this task, so I used an LED and LDR (light dependent resistor).
Light Activates Photocell
For some stupid reason, the task that involved using light to trigger a chemical reaction was changed to light activating a photocell. In v1, I used UV color change filament coupled with a color sensor to do this task. I even printed out a page from ACS that stated the UV color change was a chemical reaction.
After the rule change, this task became trivial. See Exothermic Action above. I literally put these tasks next to each other to make a point.
Electromagnet
This one’s pretty simple. I wrapped magnet wire around a steel rod to make an electromagnet. Of course, I didn’t forget the flyback diode. I placed a Hall effect sensor next to the magnet, keeping in mind polarity.
7 IMA Pulley
Unlike v1, I used a servo motor instead of a stepper for better torque, speed, ease of control, and size. I liked how I designed my own linear rails for this part.
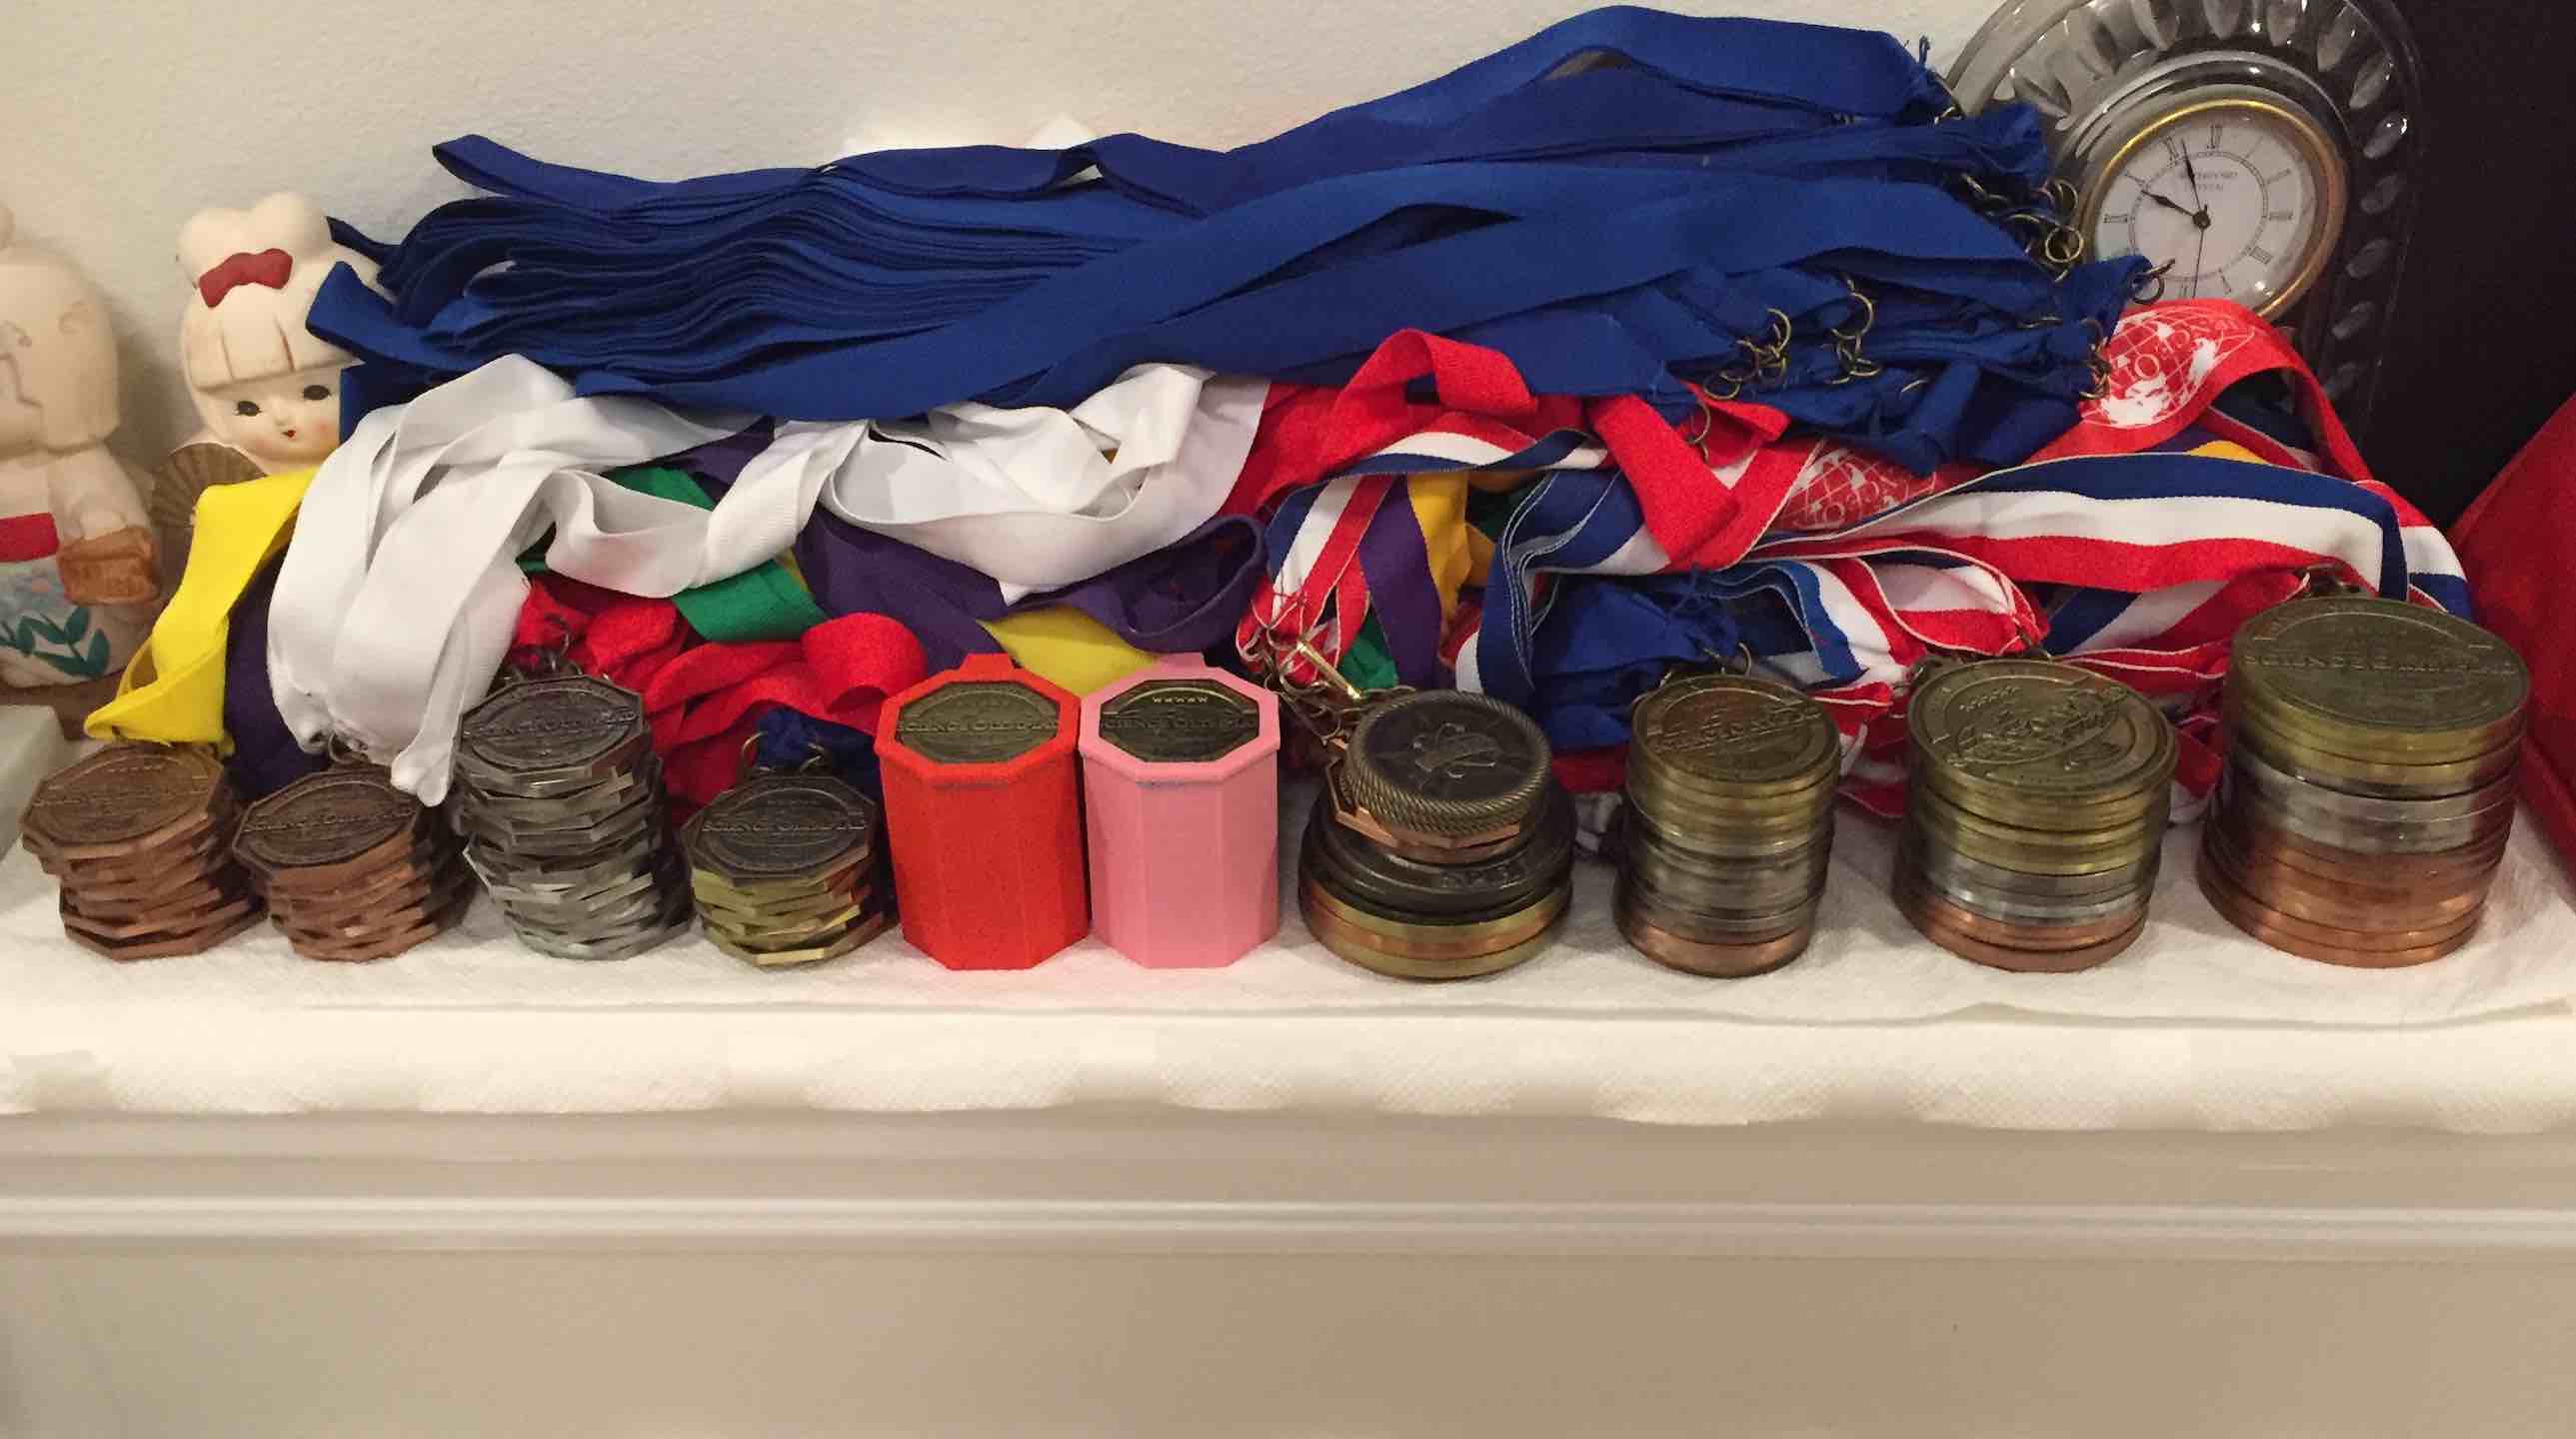
Getting a small 0.5kg weight was definitely the trickiest part. I used copper plated BBs in v1 but because of spherical packing this wasn’t optimal size wise. I needed to maximize density. Of course, this meant buying tungsten. Sadly, buying tungsten weights was ridiculously expensive for my budget. After spending two weeks talking to sellers on Alibaba trying to get a good deal I gave up.
That’s when I realized I had a relatively dense (still less than half of tungsten) material right at home. My invitational medals! They were the perfect size to build weights with. After some measurements, I determined I needed 19 medals to get ~0.54kg. Good thing I had 49 1st place invitational medals from my 6 years in SciOly.
0.5 IMA Pulley
See 7 IMA Pulley above. It’s similar.
Flipping a Quarter From Heads To Tails
Getting this one to be compact was quite the challenge. I had to do a complete redesign because a stepper motor would be too large. Other teams just dropped the coin from a certain height, which from my testing was perfectly reliable. However, this was disallowed at our State competition. I think it was allowed at Nationals but no one answered my question so I stayed safe and used the method below.
After some thinking, I came up with using a coil to launch a steel rod up, smacking a platform containing the quarter. The quarter was offset, so it would both fly up into the air as well as rotate 180°. After a bunch of tweaking, I was able to get >90% reliability. It was close to 100% if I used a charged battery and put the quarter in the right place each time.
To detect the quarter being flipped, I built a coil to use as an inductive sensor. Combining it with an LC oscillator circuit, I pretty much made a metal detector. The microcontroller would detect frequency changes to see when the coin left and fell back down. One thing to keep in mind was that turning on the coil that launched the steel rod caused a much larger frequency change so I had to be careful avoid false triggers.
Adding Water to Closed Container
The wording for this one was quite weird, but the good thing is there was a clarification. To be completely safe, I had a servo open the top of a closed container and another one would squeeze a dropper containing pure water. Then the container would seal back up.
The rules stated that we had to use pure water for this task. One interesting thing is that even distilled water is slightly conductive. Using a sufficiently high pull-up resistor, I was able to detect the presence of distilled water at some contacts at the bottom of the container.
Thermal Action Expands Gas
This one was pretty interesting to implement. After some trial and error, I came up with the idea of wrapping nichrome around a glass tube to heat up the gas inside. A bit of blue colored salt water would be placed in the top of the tube. When the gas expands, the water is pushed out, shorting two contacts, triggering the next action.
Using All Classes of Levers
This one was pretty trivial. My design goes from 1st > 2nd > 3rd class.
Chemical Timer
This was the most interesting task to implement. For v1, I came up with the perfect idea of using a candle wick. Sadly, the people over at CalTech saw this kind of design as unsafe and banned it for the State competition. With a week left to competition, I rushed to come up with a new design.
Eventually I came up with the idea of using an Alka-Seltzer tablet with a hole drilled in it to pass a string through. Once the Alka-Seltzer tablet dissolved, the string would release, dropping a weight on the other side. This idea was definitely not very reliable, but it did work.
After the State competition, I submitted multiple questions about using a flame timer, but for some reason no one answered them. This tends to happen with my questions.
“The End”
This one was pretty trivial. I did however have to modify some libraries to get it working with the Atmega328PB I used as a microcontroller. Of course, I used a recording of Emperor Palpatine saying “The End.”
CAD
Just like v1, I designed all the parts in one file in order to make sure everything fit together and didn’t interfere.
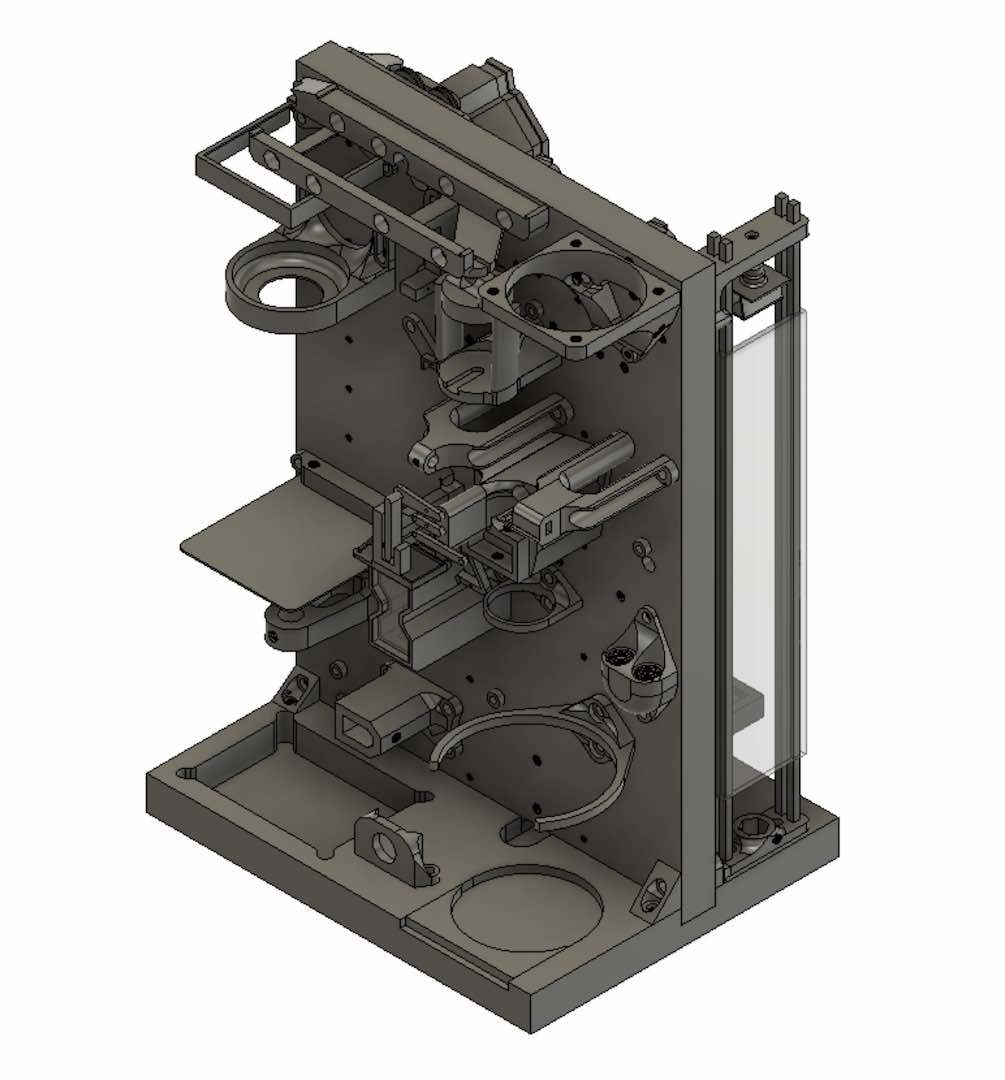
Like v1, the backboard and base were CNC milled out of some nice plywood I got from Home Depot. All the parts were printed in Inland Pink PLA.
Electronics
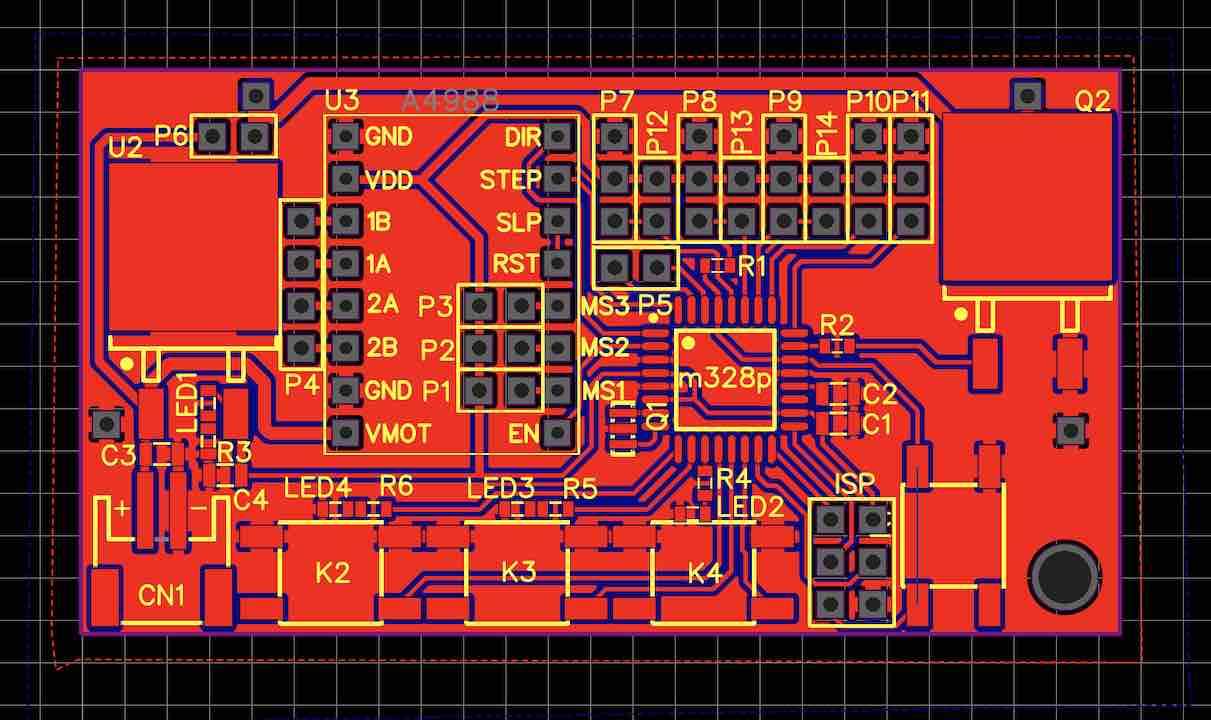
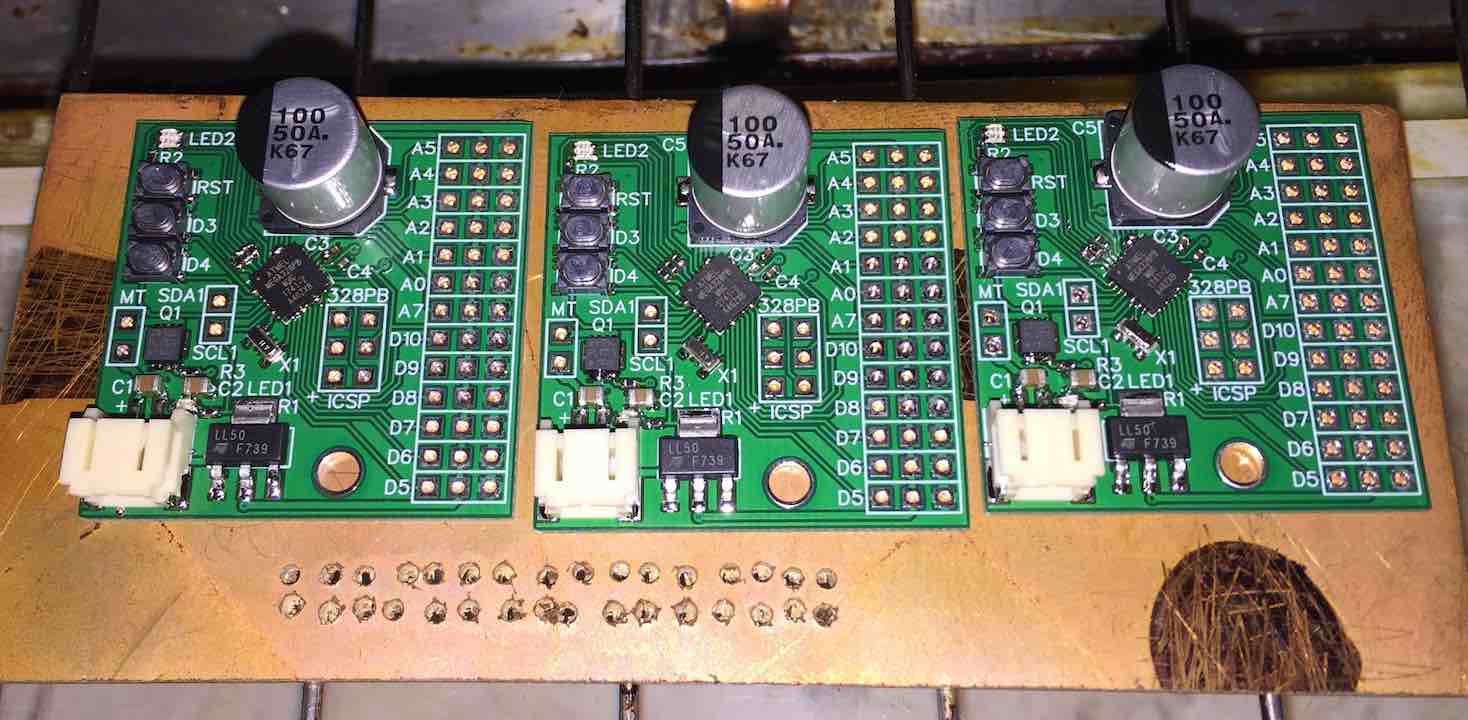
Like with v1, I designed the board in EasyEDA, but I was able to make it much smaller this time because I didn’t need to make room for a stepper driver. I used a QFN package for the microcontroller because I built a reflow oven earlier in the year. It was also an excellent opportunity to learn about the new Atmega328PB which had a few advantages over the older Atmega328P. I also used a TPN2R304PL MOSFET after finding out about Toshiba’s excellent line of MOSFETs while taking apart an ESC.
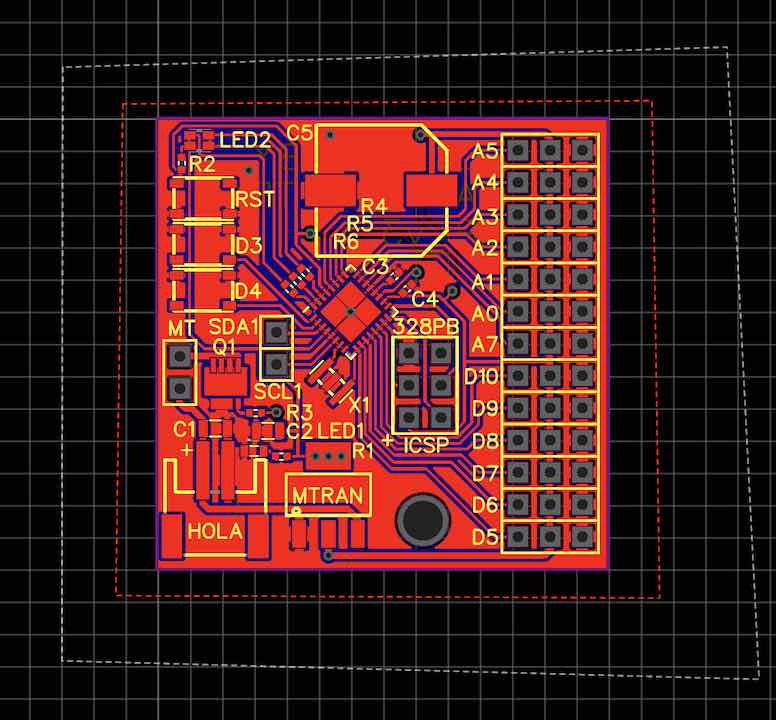
Before I sent my board to ALLPCB, I made one at home using my hybrid etch and mill method.
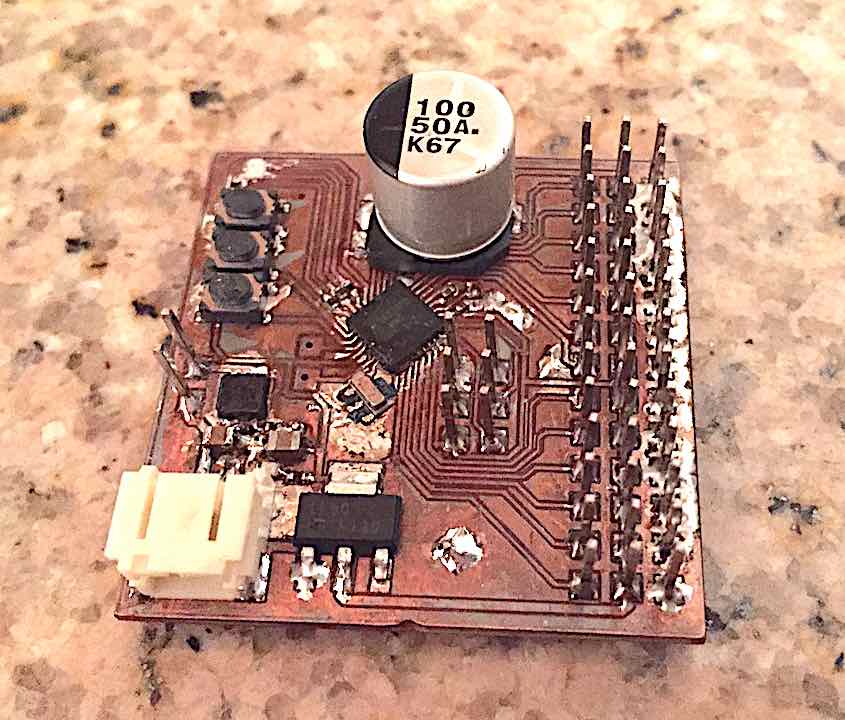
One issue I had with the boards was they weren’t very noise resistant despite the capacitor. So when using it with a noisy digital servo, the microcontroller randomly resets. I added a capacitor to the servo and that fixed things.
Code
Having recently just learned about #ifdef and #define, I used them as the basis of the structure of my code. I wanted my code to be very modular so that if a task broke in transport, I could very easily modify the code and the wiring to skip that task. I didn’t really know how to factor code in Arduino yet (there’s a button I didn’t notice until recently) so the file ended up being pretty long.
Here it is.
Conclusion
At the end of the day, I had an excellent Mission Possible device. It satisfied basically every one of my requirements. It was compact, reliable, modular, easy to use, maximized points, and most of all it was pink. I didn’t get any close up pics of it before I donated it, but here’s some pics of me at Nationals.
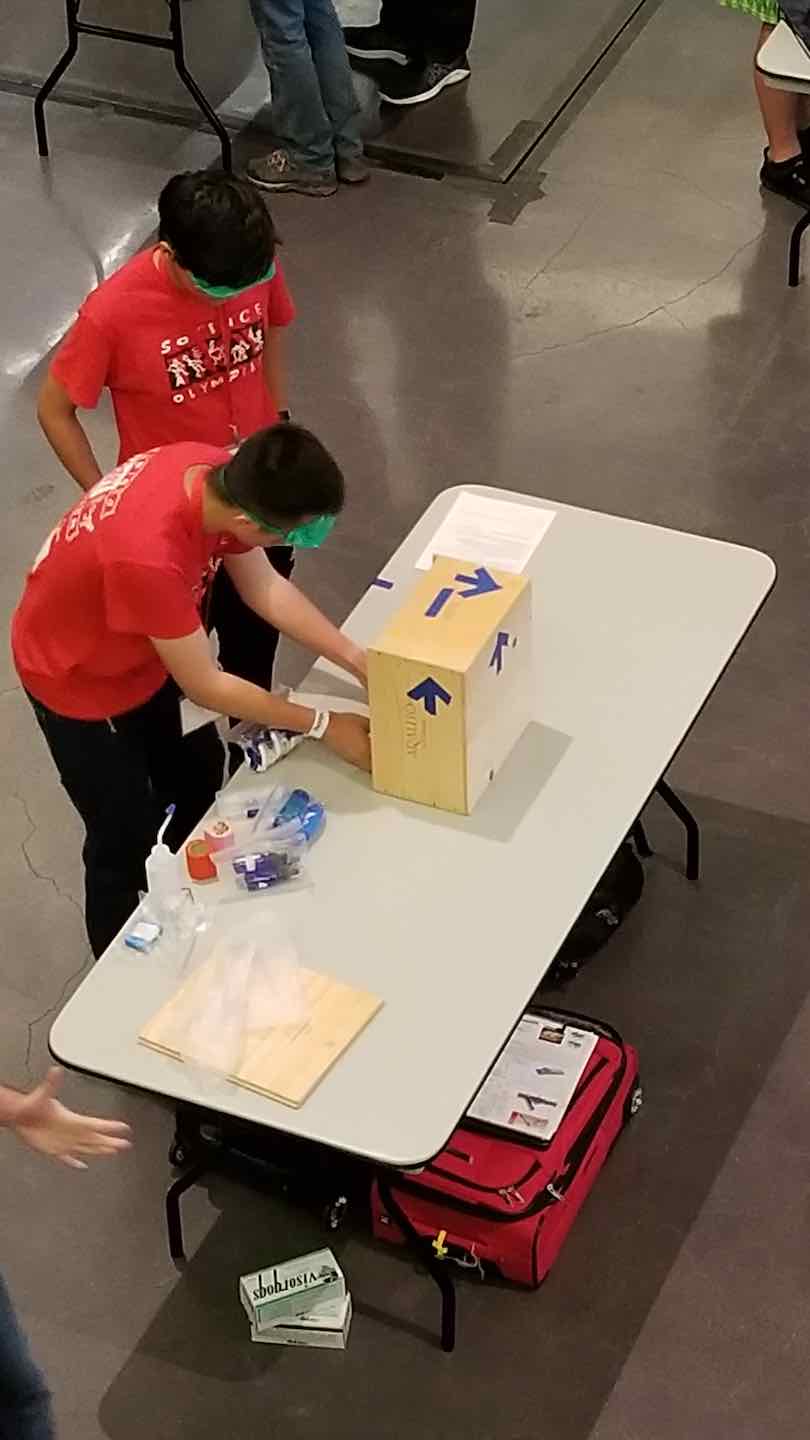
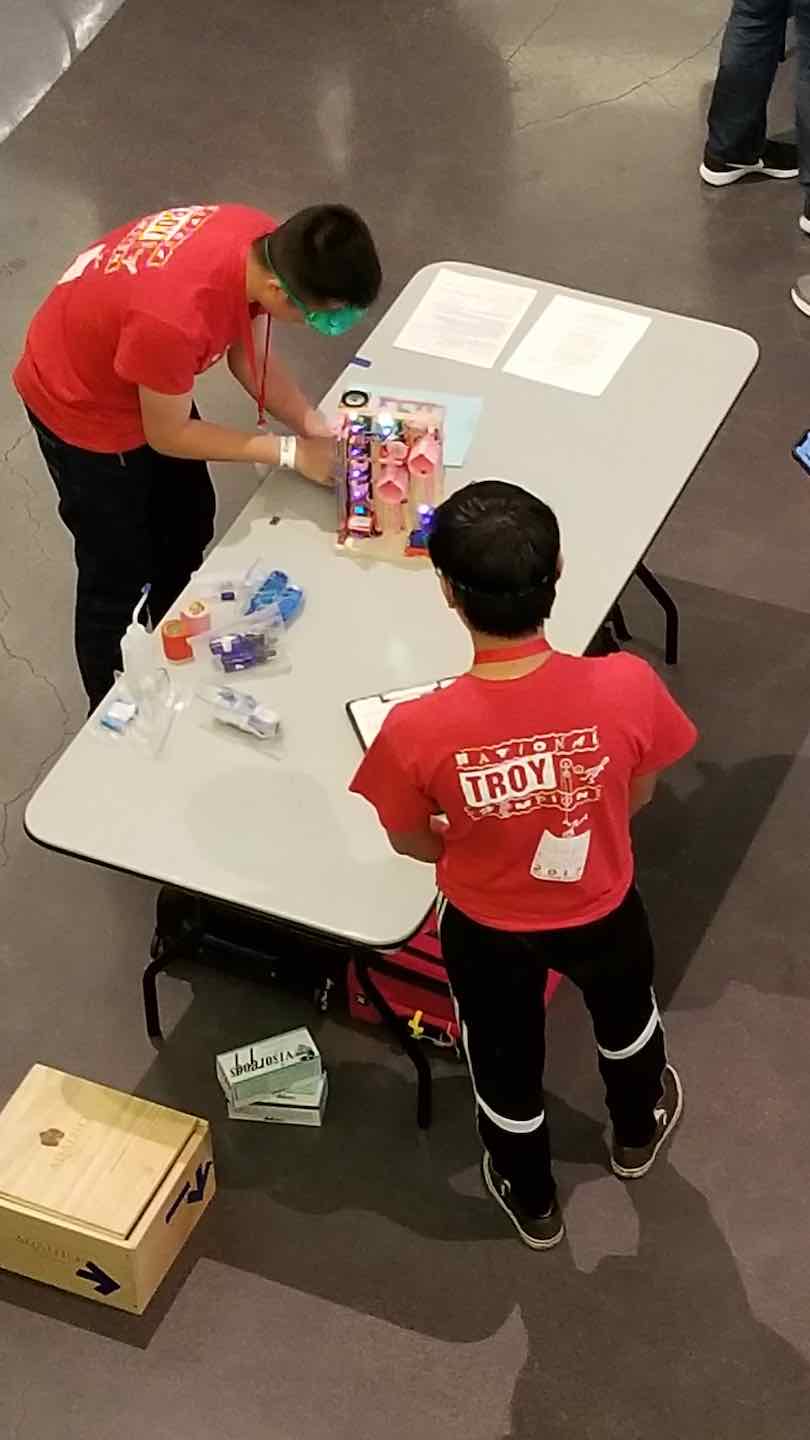
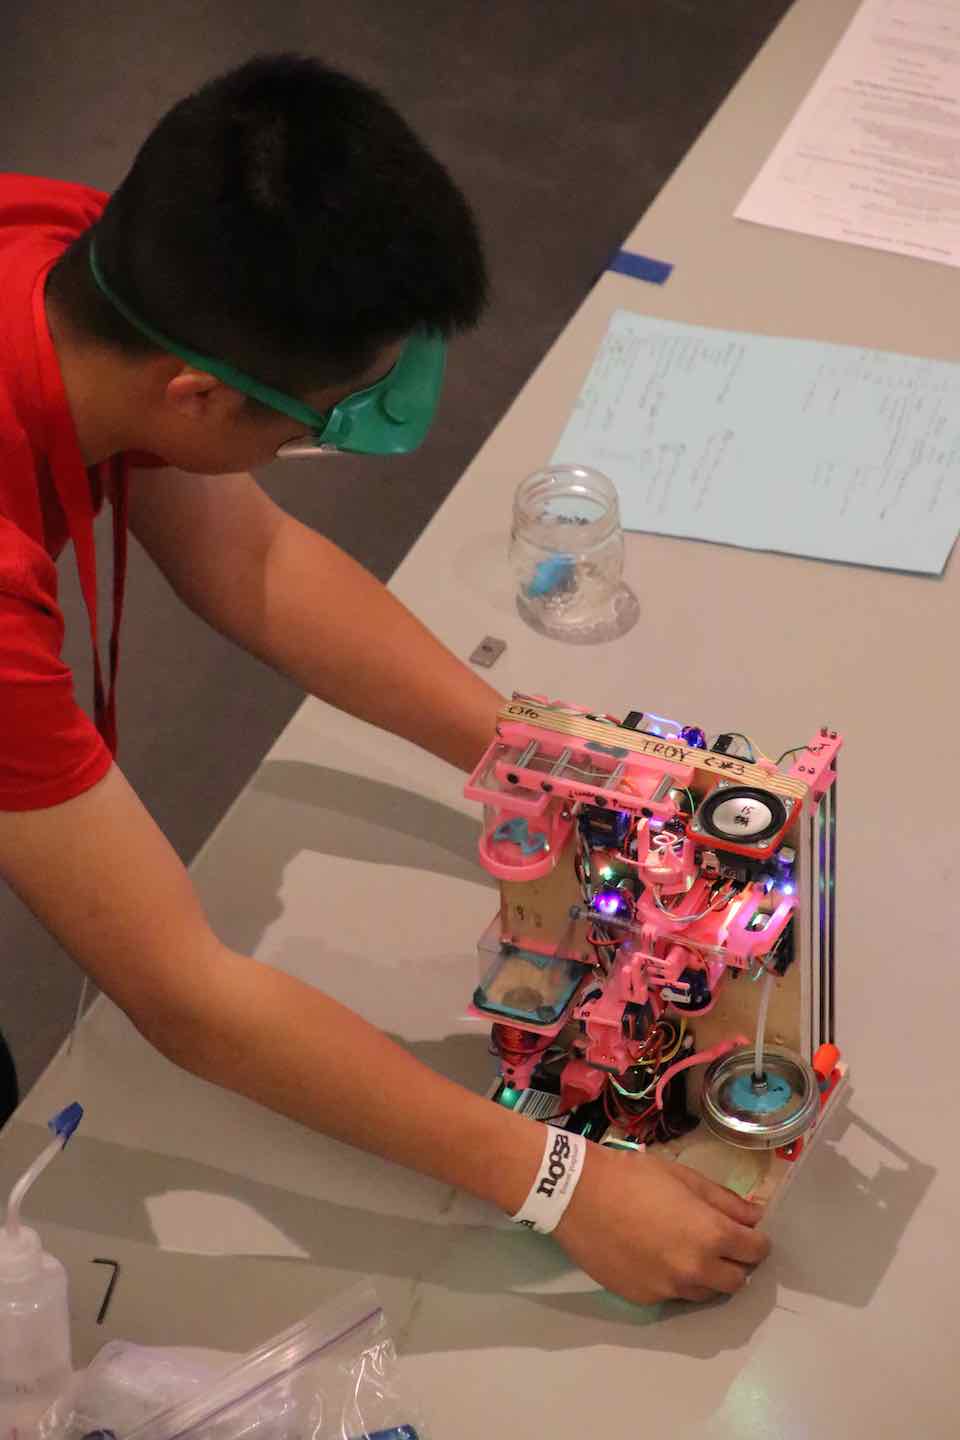
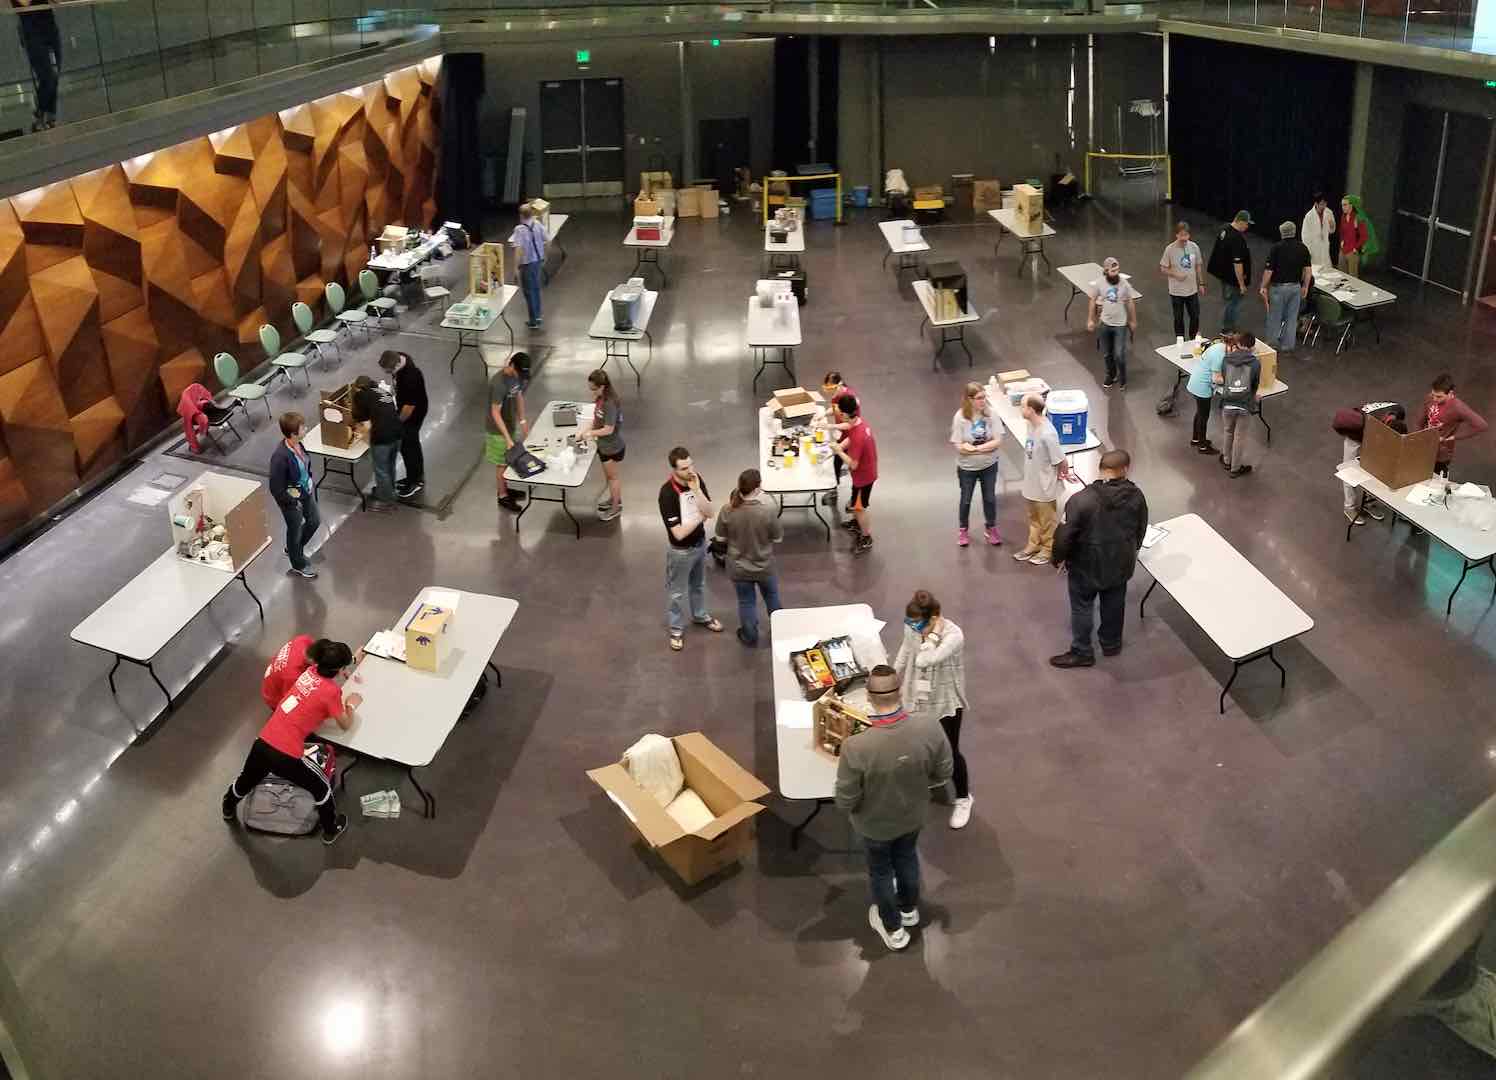
I ended up getting 2nd at Nationals, which I thought was pretty dang good. After all, my device did only cost about $300 and I had very little help in designing and building it.
After competition, I found out that the banning of my flame timer was pretty much exclusive to SoCal. Our head coach Mr. Wahl and my parents got kind of mad about that since we were never notified that flame timers were ok at nationals. Oh well.
At the end of the day, what really mattered was the fun and learning that we all got doing SciOly. For that I am thankful.


Comments